Why using Infrastructure as Code for developing Cloud-based Data Warehouse Systems?
In the contemporary age of Big Data, Data Warehouse Systems and Data Science Analytics Infrastructures have become an essential component for organizations to store, analyze, and make data-driven decisions. With the evolution of cloud computing, many organizations are now migrating their Data Warehouse Systems to the cloud for better scalability, flexibility, and cost-efficiency. Infrastructure as Code (IaC) can be a game-changer in this scenario. By automating the provisioning and management of cloud resources through code, IaC brings a host of advantages to the development and maintenance of Data Warehouse Systems in the cloud.
So why using IaC for Cloud Data Infrastructures?
Of course you – as a human user – can always login into the admin portal of any cloud provider and manually get your resources like SQL databases, ETL tools, Virtual Networks and tools like Synapse, snowflake, BigQuery or Databrikcs in place by clicking on the right buttons….. But here is why you should better follow the idea of having your code explaining which resources are in what order in place in your cloud:
Version Control for your Cloud Infrastructure
One of the primary advantages of using IaC is version control for your Data Warehouse – or Data Lakehouse – Architecture. Whether you’re using Redshift, Snowflake, or any other cloud-based data warehouse solutions, you can codify your architecture settings, allowing you to track changes over time. This ensures a reliable and consistent development environment and makes it easier to identify issues, rollback updates, or replicate the architecture for other projects.
Scalability Tailored for Data Needs
Data Warehouse Systems often require to scale quickly to handle larger datasets or more queries. Traditional manual scaling methods are cumbersome and slow. IaC allows for efficient auto-scaling based on real-time needs. You can write scripts to automatically provision or de-provision resources depending on your data workloads, making your data warehouse highly adaptive to your organization’s changing requirements.
Cost-Efficiency in Resource Allocation
Cloud resources are priced based on usage, so efficient allocation is crucial for managing costs. IaC enables precise control over cloud resources, allowing you to turn them off when not in use or allocate more resources during peak times. For Data Warehouse Systems that often require powerful (and expensive) computing resources, this level of control can translate into significant cost savings.
Streamlined Collaboration Among Teams
Data Warehouse Systems in the cloud often involve cross-functional teams — data engineers, data scientists, and system administrators. IaC allows these teams to collaborate more effectively. Everyone works with the same infrastructure configurations, reducing discrepancies between development, staging, and production environments. This ensures that the data models and queries developed by data professionals are consistent with the underlying infrastructure.
Enhanced Security and Compliance
Data Warehouses often store sensitive information, making security a paramount concern. IaC allows security configurations to be codified and automated, ensuring that every new resource or service deployed complies with organizational and regulatory guidelines. This proactive security approach is particularly beneficial for industries that have to adhere to strict compliance rules like HIPAA or GDPR.
Reliable Environment for Data Operations
Manual configurations are prone to human error, which can compromise the reliability of a Data Warehouse System. IaC mitigates this risk by automating repetitive tasks, ensuring that the infrastructure is consistently provisioned. This brings reliability to data ETL (Extract, Transform, Load) processes, query performances, and other critical data operations.
Documentation and Disaster Recovery Made Easy
Data is the lifeblood of any organization, and losing it can be catastrophic. IaC allows for swift disaster recovery by codifying the entire infrastructure. If a disaster occurs, the infrastructure can be quickly recreated, reducing downtime and data loss.
Most common IaC solutions
The most common tools for creating Cloud Infrastructure as Code are probably Terraform and Pulumi. However, IaC solutions can be very different in their concepts. For example: While Terraform is a pure declarative configuration language that just describes how the infrastructure will look like (execution then by the Terraform-supporting Cloud Provider), Pulumi on the other hand will execute the deployment by a programming language iteratively deploying the wished cloud resources (e.g. using for loops in Python). While executing Pulumi in any supported programming language like Python or C#, Pulumi generates declarative Infrastructure build plans for the Cloud. Any IaC solution is declaring how the infrastrcture looks like.
Terraform
Terraform is one of the most widely used Infrastructure as Code (IaC) tools, developed by HashiCorp. It enables users to define and provision a data center infrastructure using a declarative configuration language known as HashiCorp Configuration Language (HCL).
The following Terraform script will create an Azure Resource Group, a SQL Server, and a SQL Database. It will also output the fully qualified domain name (FQDN) of the SQL Server, which you can use to connect to the database:
|
1 2 3 4 5 6 7 8 9 10 11 12 13 14 15 16 17 18 19 20 21 22 23 24 25 26 27 28 29 |
provider "azurerm" { features {} } resource "azurerm_resource_group" "example" { name = "example-resources" location = "East US" } resource "azurerm_sql_server" "example" { name = "example-sqlserver" resource_group_name = azurerm_resource_group.example.name location = azurerm_resource_group.example.location version = "12.0" administrator_login = "adminUser" administrator_login_password = "adminPassword1234!" } resource "azurerm_sql_database" "example" { name = "example-sqldb" resource_group_name = azurerm_resource_group.example.name server_name = azurerm_sql_server.example.name location = azurerm_resource_group.example.location edition = "Basic" } output "sql_server_fqdn" { value = azurerm_sql_server.example.fully_qualified_domain_name } |
The HCL code needs to be placed into the Terrafirm main.tf file. Of course, Terraform and the Azure CLI needs to be installed before.
Pulumi
Pulumi is a modern Infrastructure as Code (IaC) tool that sets itself apart by allowing infrastructure to be defined using general-purpose programming languages like Python, TypeScript, Go, and C#.
Example of a Pulumi Python script creating a SQL Database on Microsoft Azure Cloud:
|
1 2 3 4 5 6 7 8 9 10 11 12 13 14 15 16 17 18 19 20 21 22 23 24 25 26 27 28 29 |
import * as pulumi from "@pulumi/pulumi"; import * as azure from "@pulumi/azure"; // Create an Azure Resource Group const resourceGroup = new azure.core.ResourceGroup("myResourceGroup", { location: "EastUS", }); // Create an Azure SQL Server const sqlServer = new azure.sql.SqlServer("mySqlServer", { resourceGroupName: resourceGroup.name, location: resourceGroup.location, version: "12.0", administratorLogin: "adminUser", administratorLoginPassword: "adminPassword1234!", }); // Create an Azure SQL Database on the SQL Server const sqlDatabase = new azure.sql.Database("mySqlDatabase", { resourceGroupName: resourceGroup.name, serverName: sqlServer.name, location: resourceGroup.location, edition: "Basic", }); // Export connection string for the SQL Database export const sqlConnectionString = pulumi.all([sqlServer.name, resourceGroup.name, sqlDatabase.name]).apply(([serverName, rgName, dbName]) => { return `Server=tcp:${serverName}.database.windows.net;initial catalog=${dbName};user ID=adminUser;password=adminPassword1234!;Min Pool Size=0;Max Pool Size=30;Persist Security Info=true;`; }); |
Running the script will need the installation of Python, Pulumi and the Azure CLI.
Cloud Provider specific IaC Solutions
Cloud providers might come up with their own IaC solutions, here are the probably most common ones:
Microsoft Azure Bicep is an open-source domain-specific language (DSL) developed by Microsoft, aimed at simplifying the process of deploying Azure resources. It serves as a declarative alternative to JSON for writing Azure Resource Manager (ARM) templates. Bicep compiles down to ARM templates, offering a more concise syntax and easier tooling while leveraging the proven, underlying ARM deployment engine.
AWS CloudFormation is a service offered by Amazon Web Services (AWS) that allows you to define cloud infrastructure in JSON or YAML templates.
Google Cloud Deployment Manager is quite similar to AWS CloudFormation but tailored for Google Cloud Platform (GCP), it allows you to define and deploy resources using YAML or Python templates.
IaC Tools for Server Configuration
There are many other IaC solutions and some of them are more focused on configuration of servers. In common they offer software provisioning as well and a lot detailing in regards to micro-configuration of single applications running on the server.
The most common IaC software for Server Configuration might be Ansible, a YAML-based configuration management tool that uses an agentless architecture. It’s easy to set up and widely used for automating tasks like software provisioning and configuration management. Puppet, Chef and SaltStack are further alternatives and master-agent architecture-based.
Other types of IaC Solutions
IaC solutions with a more narrow focus are e.g. Vagrant as a primarily used IaC tool for setting up virtual development environments, especially for the automation of VM (Virtual Machine) provisioning. The widely used Docker Compose is a tool for defining and running multi-container Docker applications, which can be defined using YAML files.
Furthermore we have tools that are working closely together with IaC tooling, e.g. Prometheus as an open-source monitoring toolkit often used in conjunction with other IaC tools for monitoring deployed resources.
Conclusion
Infrastructure as Code significantly enhances the development and maintenance of Cloud-based Data Infrastructures. From versioning your warehouse architecture and scaling resources according to real-time data needs, to facilitating team collaboration and ensuring security compliance, IaC serves as a foundational technology that brings agility, reliability, and cost-efficiency. As organizations continue to realize the importance of data-driven decision-making, leveraging IaC for cloud-based Data Warehouse Systems will likely become a best practice in data engineering and infrastructure management.


 and
and 
 , where
  , respectively from English and German corpus, then we learn a mapping
  .
. . Thus
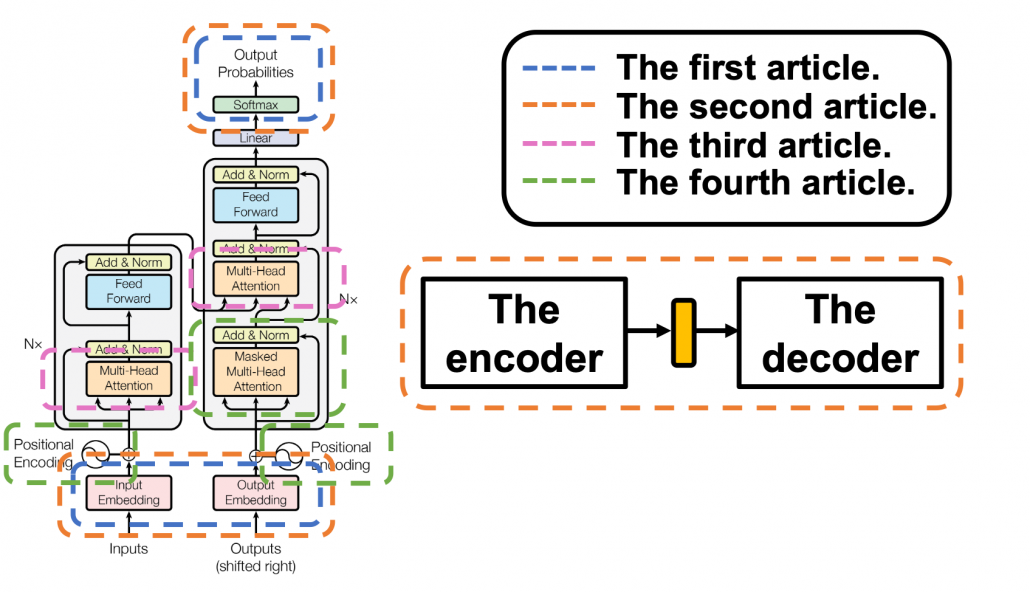
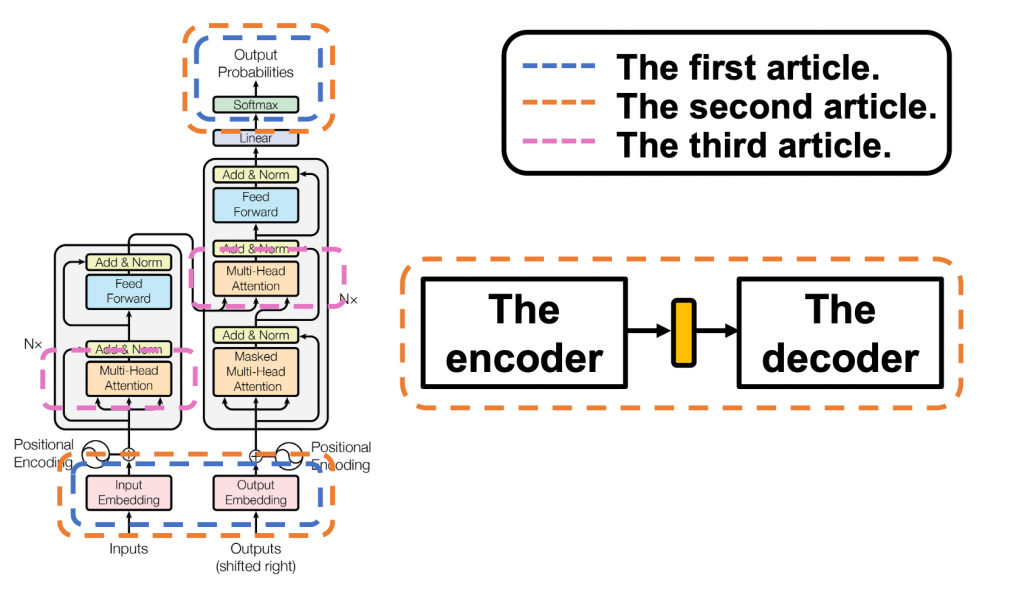
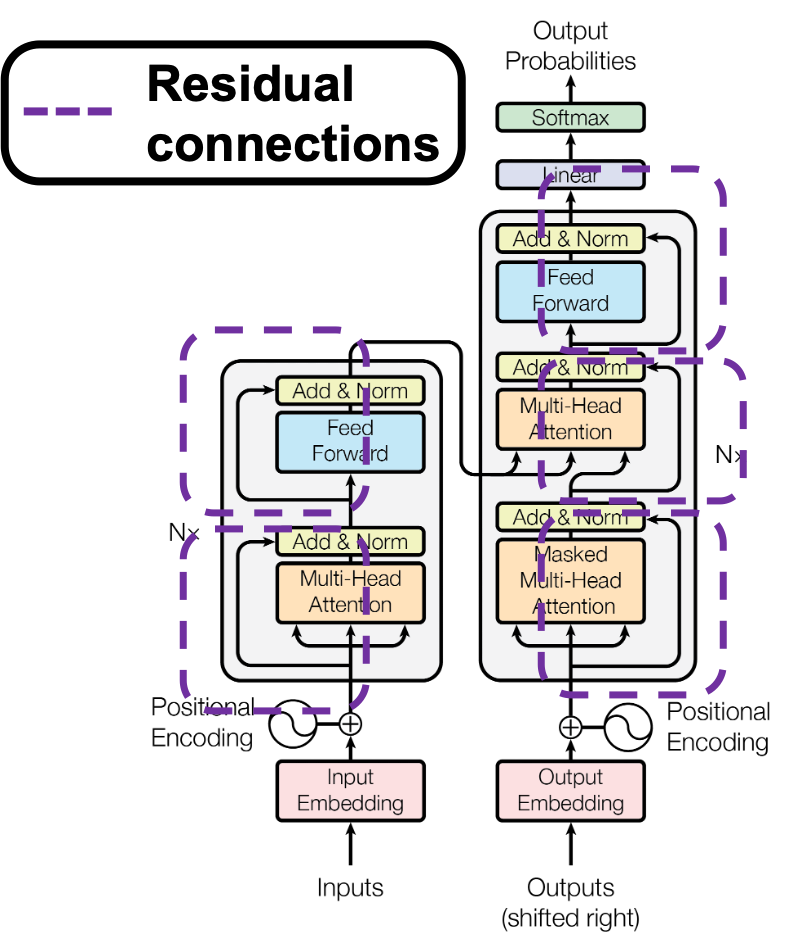
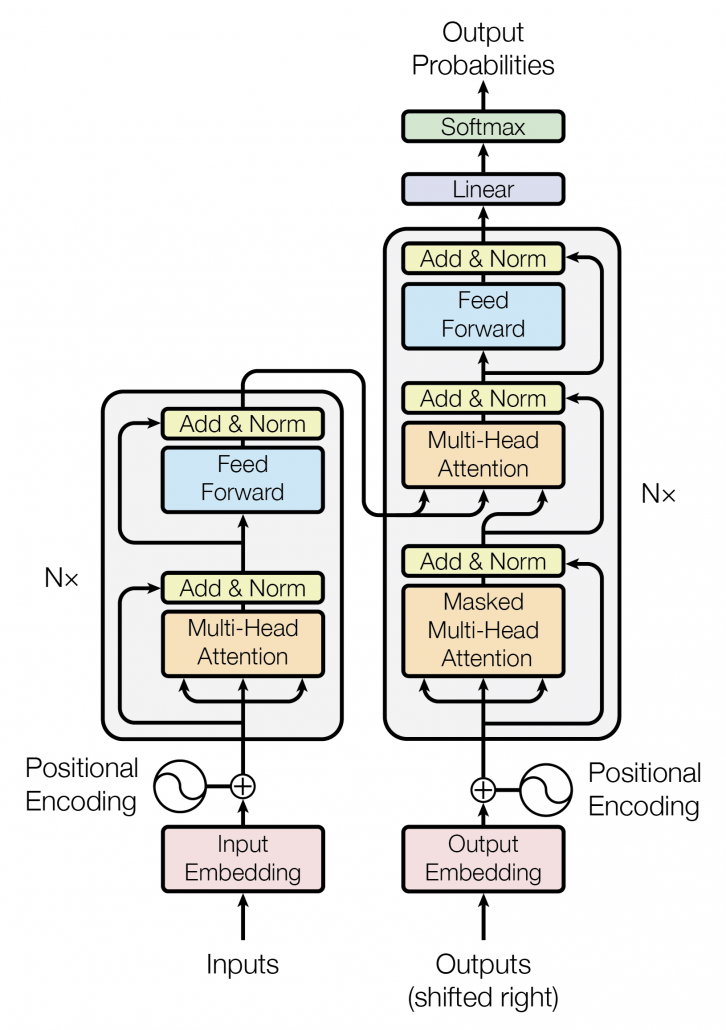
 layers. The decoder part also keeps converting the inputs in the target languages, also through
 . In short you stack two fully connected layers and activate it with a ReLU function. Let’s see how point_wise_feed_forward_network() function works in the implementation with some simple codes. As you can see from the number of parameters in each layer of the position wise feed forward neural network, the network does not depend on the length of the sentences.
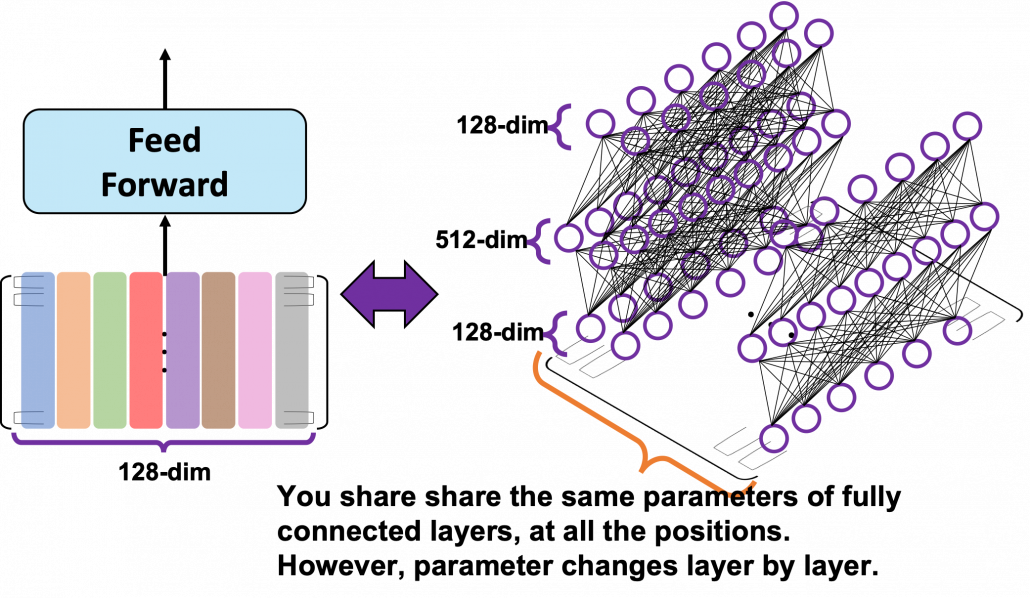
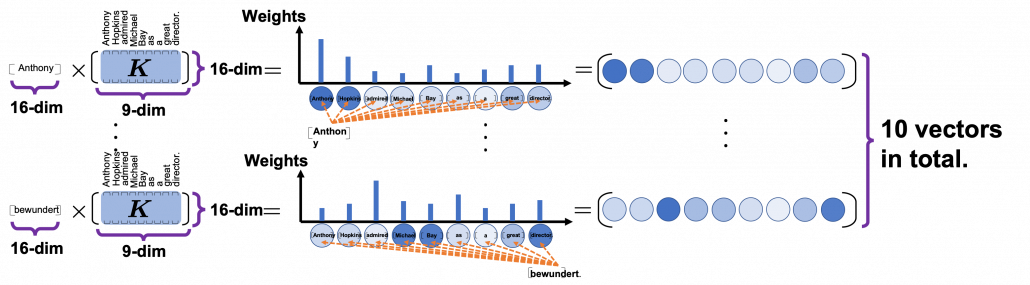
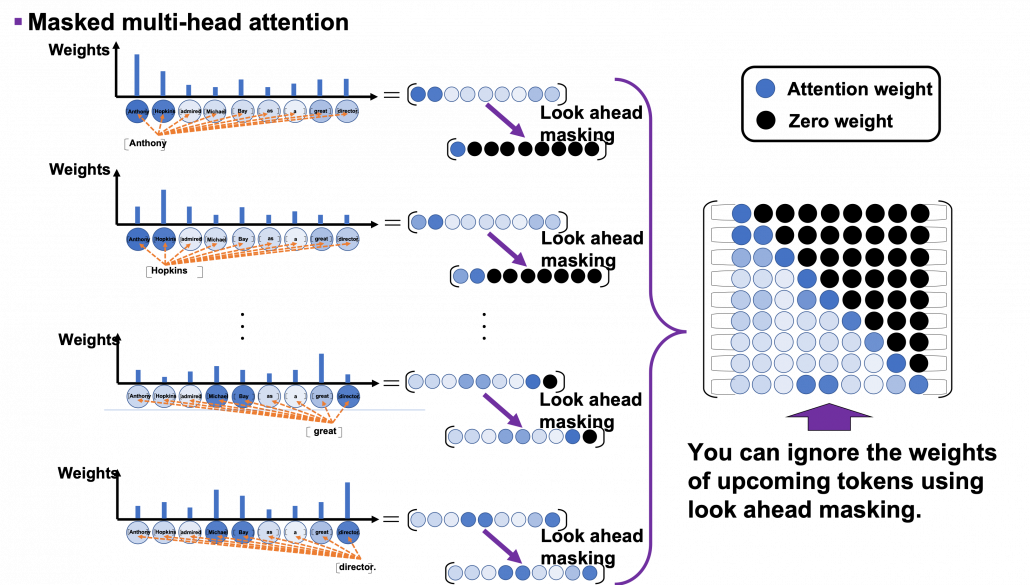
 . In the example above, the resulting multi-head attention map is a
  matrix like in the figure below.
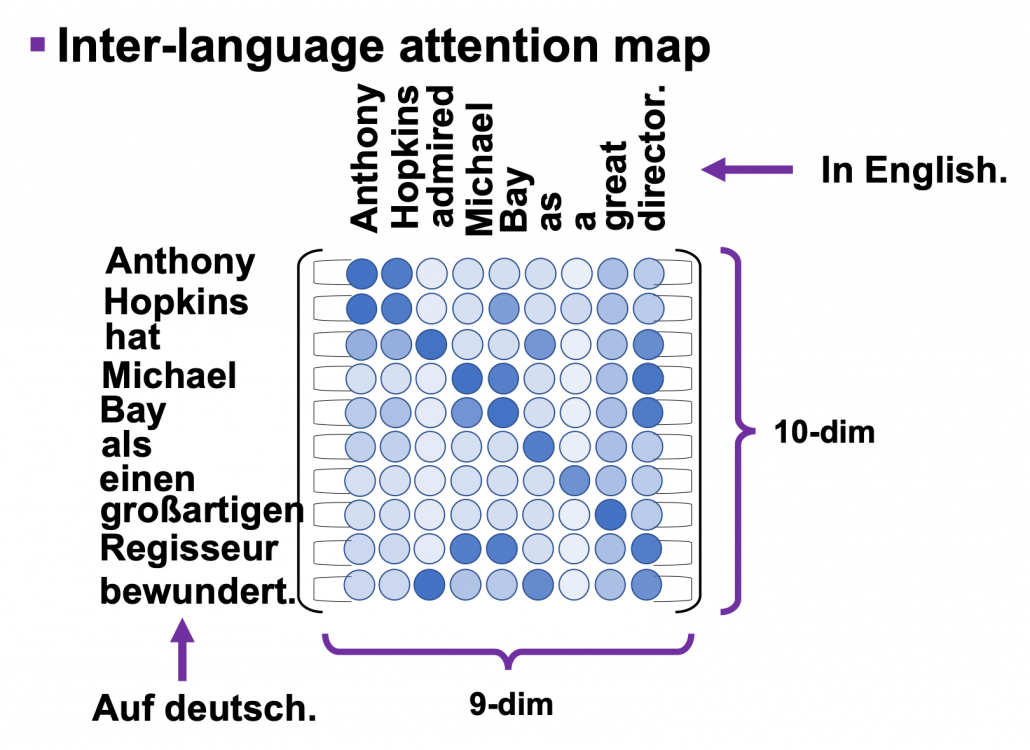
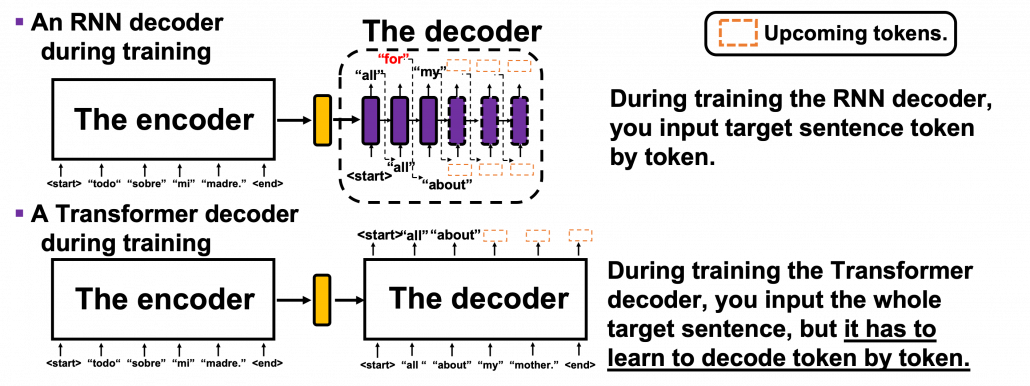
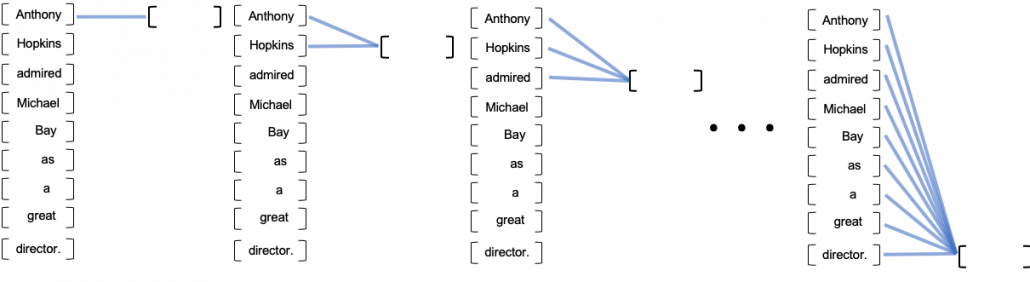
 can depend only on the known outputs at positions less than
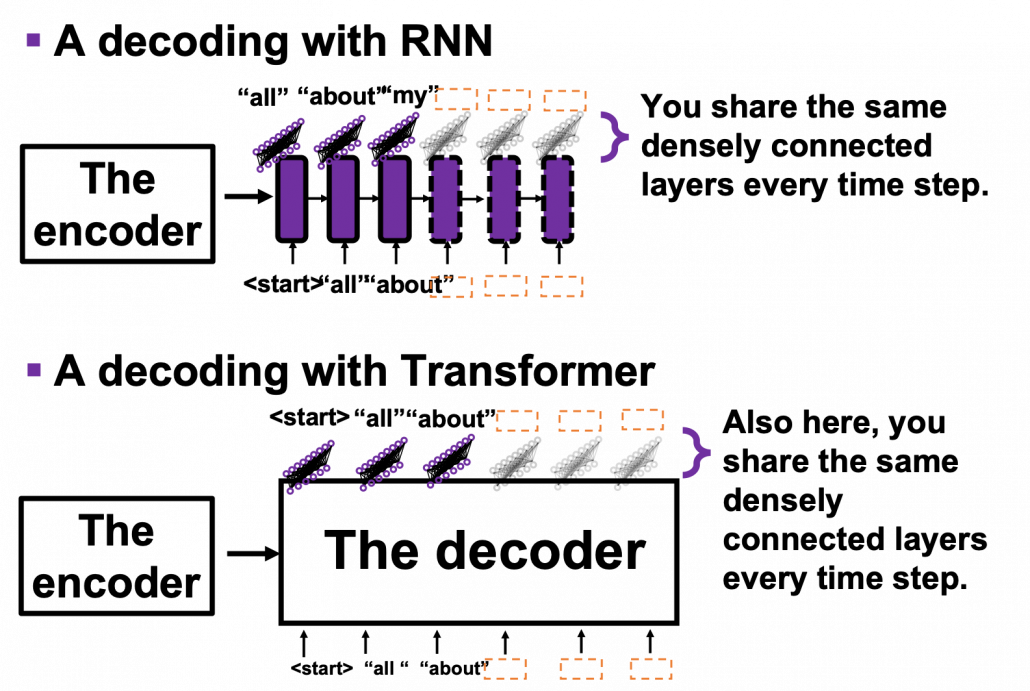
 tokens, basically you have to wait for
  the RNN cell retains the information at the time step
  only via recurrent connections. In this way you cannot attend to tokens in the earlier time steps, and this is obviously far from how we compare tokens in a sentence. You can bring information backward by bidirectional connection s in RNN models, but that all the more deteriorate parallelization of the model. And possessing information via recurrent connections, like a telephone game, potentially has risks of vanishing gradient problems. Gated RNN, such as LSTM or GRU mitigate the problems by a lot of nonlinear functions, but that adds to computational costs. If you understand multi-head attention mechanism, I think you can see that Transformer solves those problems.
 , but if you naively give the term
 ![[0, 1]](https://data-science-blog.com/wp-content/ql-cache/quicklatex.com-caffaae885a1287e3dfc31bfb1cd0694_l3.png "Rendered by QuickLaTeX.com") . With this approach, however, the resolution of encodings can vary depending on the length of the input sequence data. Thus these naive approaches do not meet the requirements above, and I guess even conventional RNN-based models were not so successful in these points.
. With this approach, however, the resolution of encodings can vary depending on the length of the input sequence data. Thus these naive approaches do not meet the requirements above, and I guess even conventional RNN-based models were not so successful in these points. ,
,  , where
  .
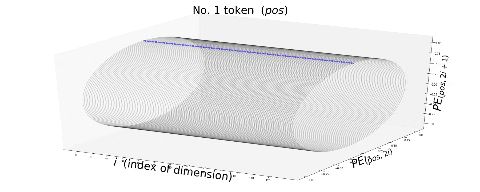
.  is the dimension of word embedding. The heat map below is the most typical type of visualization of positional encoding you would see everywhere, and in this case
  , and
, and  is discrete number which varies from
  to
to  , thus the heat map blow is equal to a
  matrix, whose elements are from
  to
to  . Each row of the graph corresponds to one token, and you can see that lower dimensional part is constantly changing like waves. Also it is quite easy to encode an input with this positional encoding: assume that you have a matrix of an input sentence composed of 50 tokens, each of which is a 256 dimensional vector, then all you have to do is just adding the heat map below to the matrix.
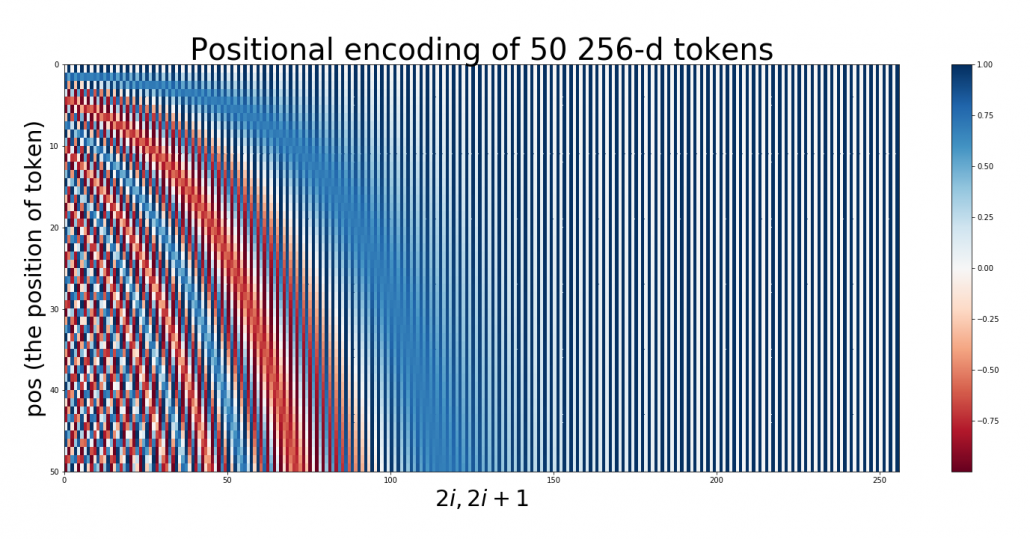

 .
. pairs of circles rather than
 . If you constantly change the value
  rotates clockwise on the unit circle in the figure below.
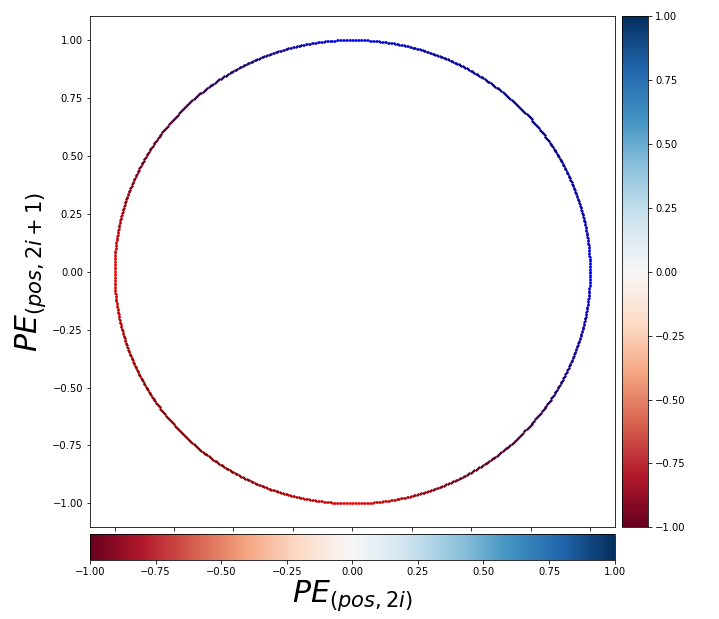
 ,
,  can be represented as a linear function of
  .” For each circle at any depth, I mean for any

 , where
  . Also the shift from “Bay” to “great” has the same rotation.
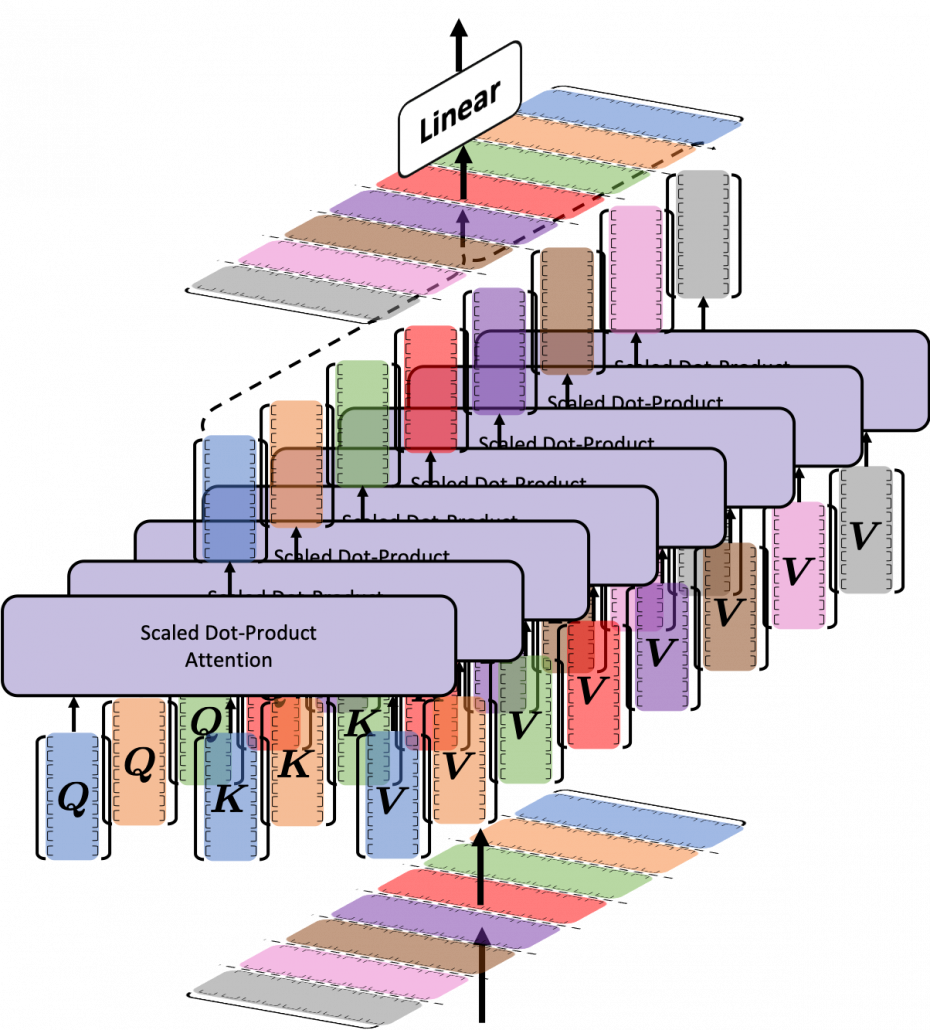
 matrix. You first split each token into
  dimensional, 8 vectors in total, as I colored in the figure below. In other words, the input matrix is divided into 8 colored chunks, which are all
  matrices, but each colored matrix expresses the same sentence. And you calculate self-attentions of the input sentence independently in the 8 heads, and you reweight the “values” according to the attentions/weights. After this, you stack the sum of the reweighted “values” in each colored head, and you concatenate the stacked tokens of each colored head. The size of each colored chunk does not change even after reweighting the tokens. According to Ashish Vaswani, who invented Transformer model, each head compare “queries” and “keys” on each standard. If the a Transformer model has 4 layers with 8-head multi-head attention , at least its encoder has
  heads, so the encoder learn the relations of tokens of the input on 32 different standards.
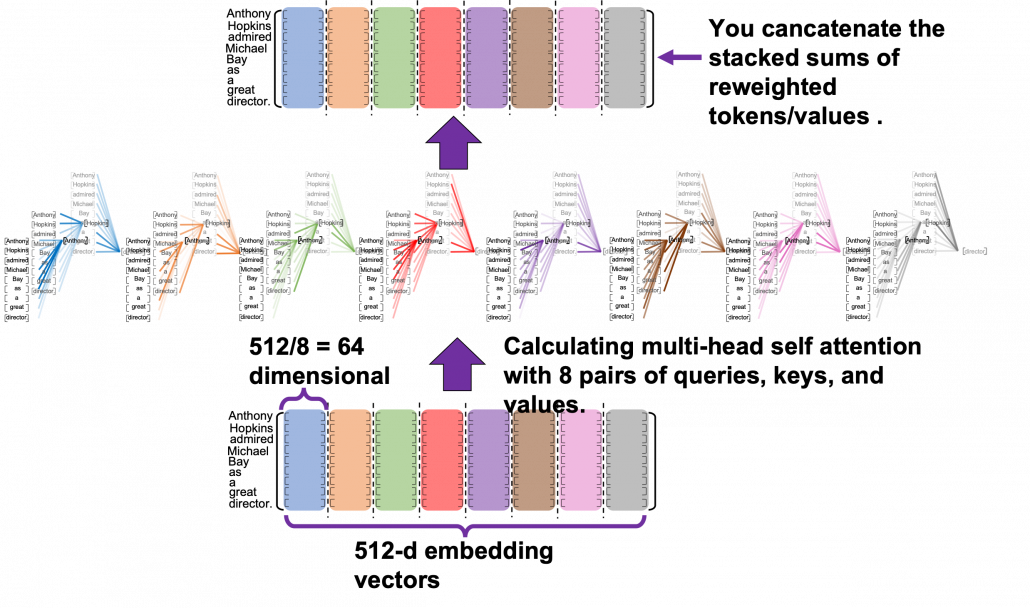
![[ \cdots ]](https://data-science-blog.com/wp-content/ql-cache/quicklatex.com-a935a6ae352397cdde28cd5115cc275a_l3.png "Rendered by QuickLaTeX.com") denotes a token, which is usually an embedding vector in practice.
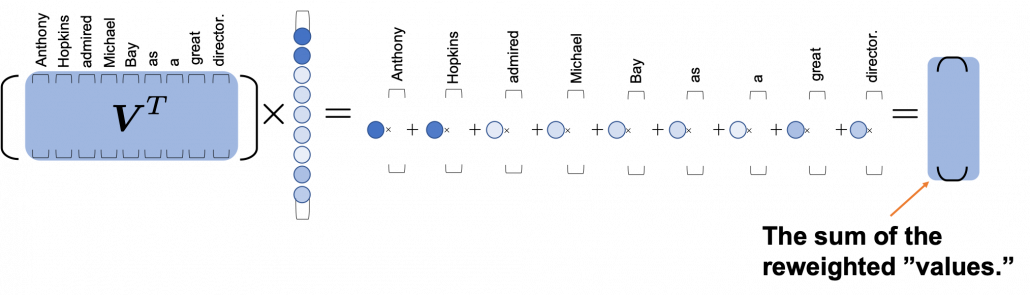
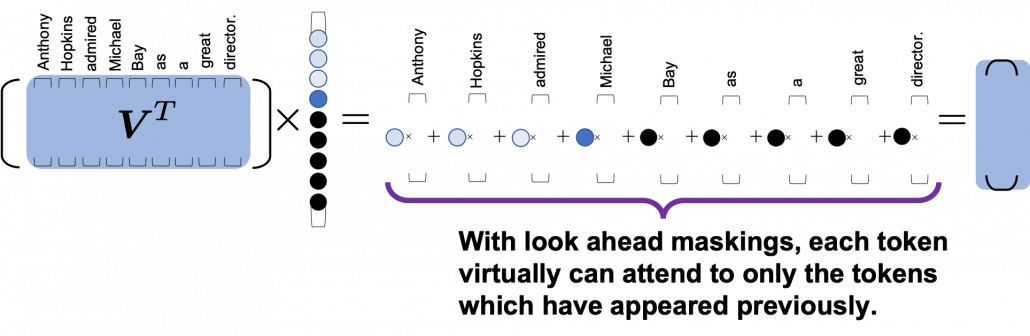
denotes a token, which is usually an embedding vector in practice.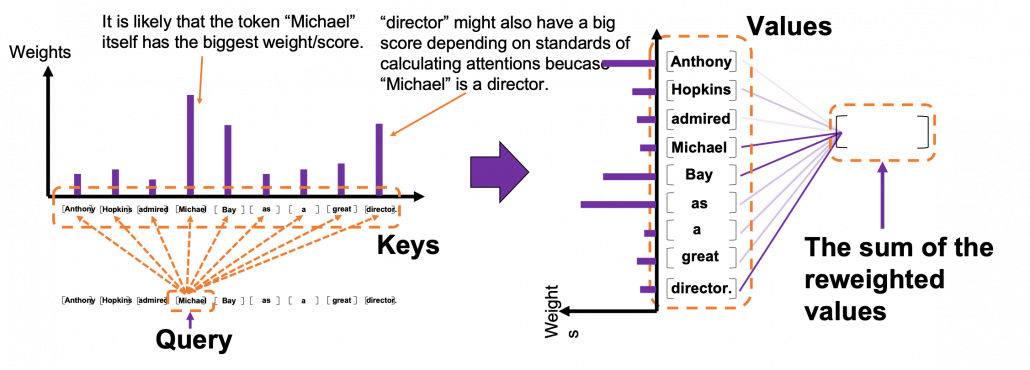 *I have been repeating the phrase “reweighting ‘values’ with attentions,” but you in practice calculate the sum of those reweighted “values.”
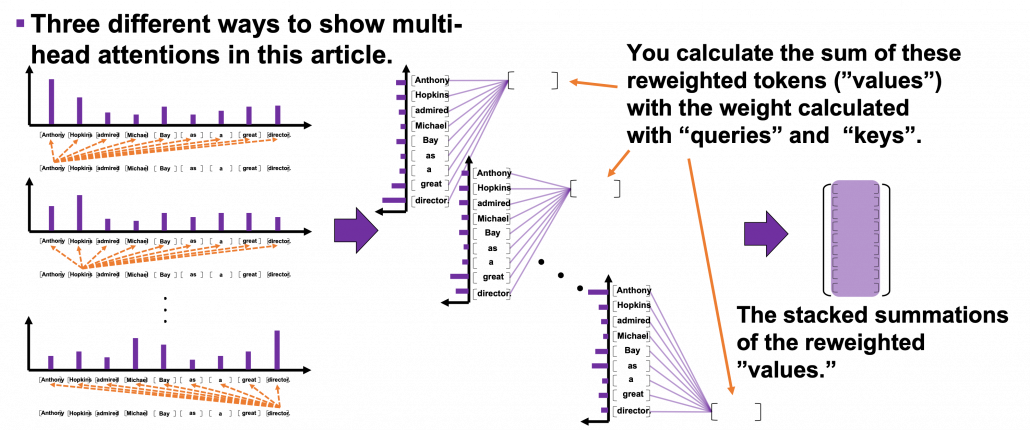

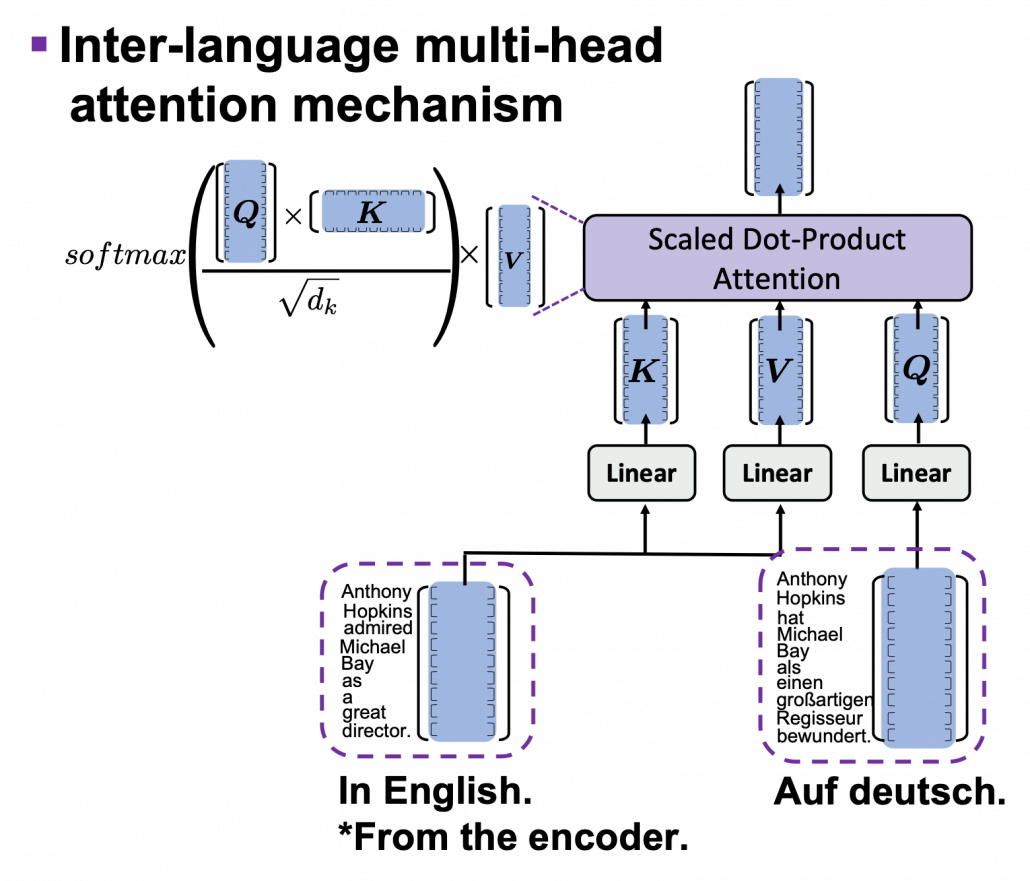
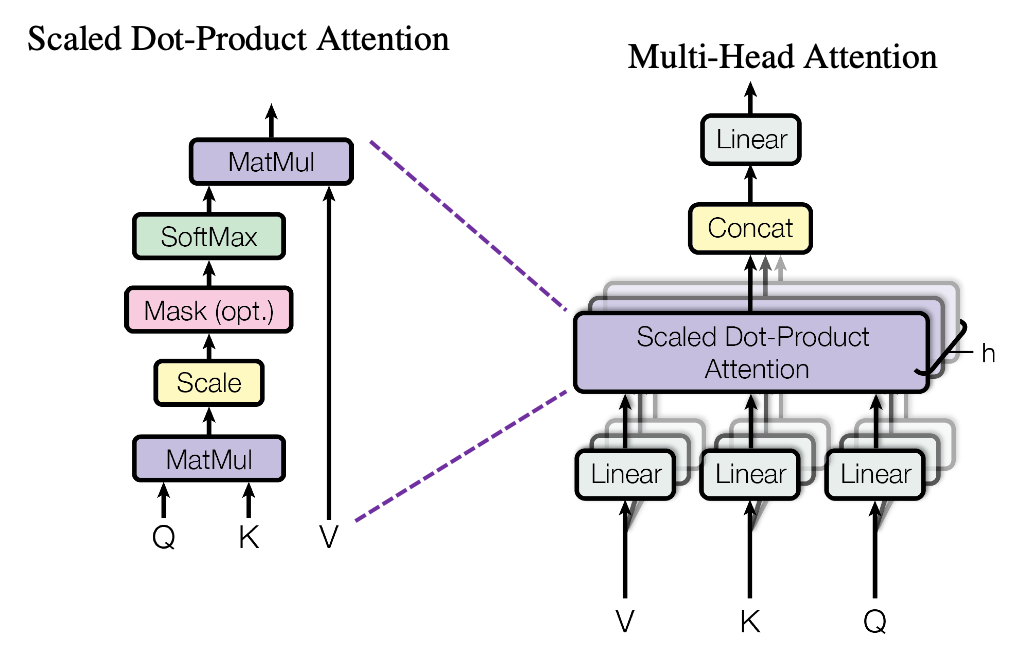
 . Let’s take an example of calculating a scaled dot-product in the blue head.
 , which are “queries”, “keys”, and “values” respectively.
 by
by  in the formula. According to the original paper, it is known that re-scaling
  by
by 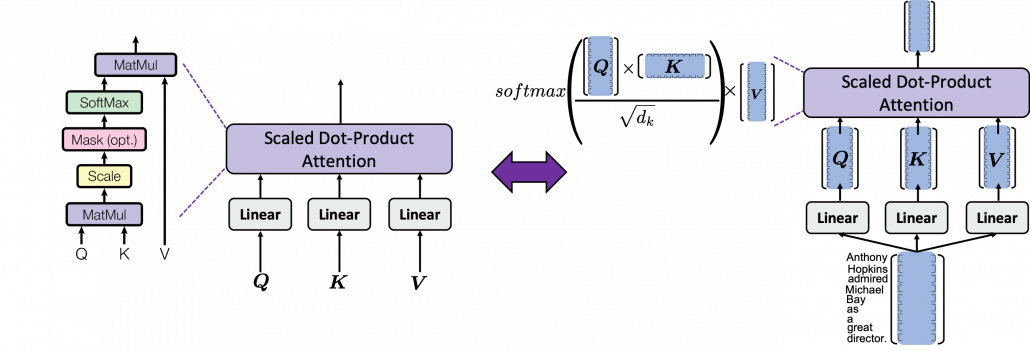
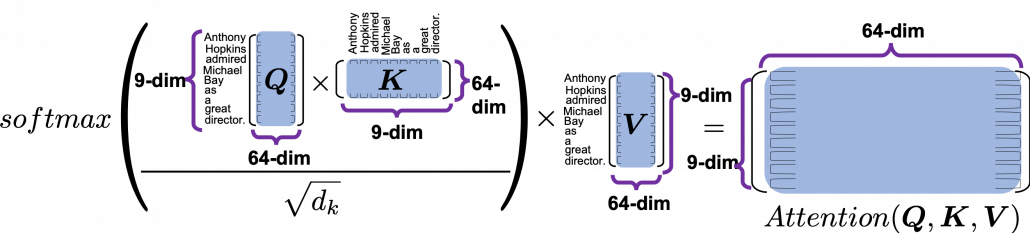
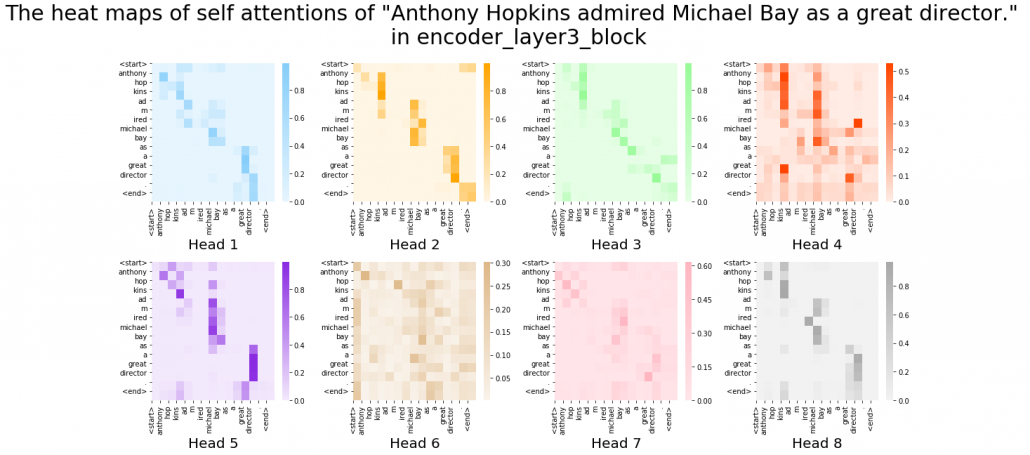
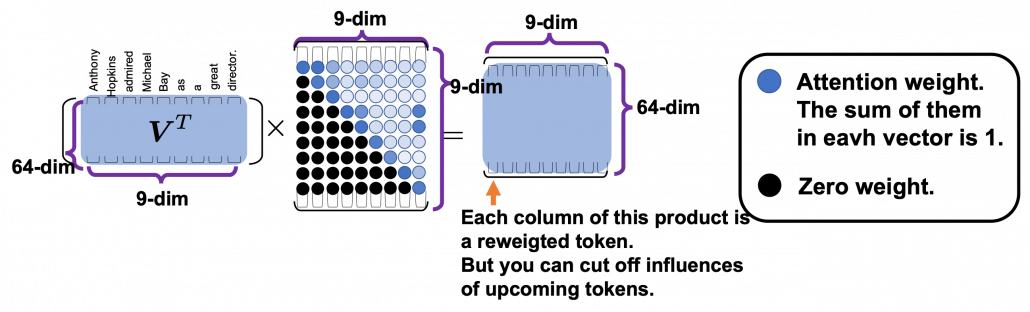
 , and the resulting
  matrix is a kind a heat map of self-attentions.
 and regularizing them with a softmax function, you stack those vectors, and the stacked vectors is the heat map of attentions.
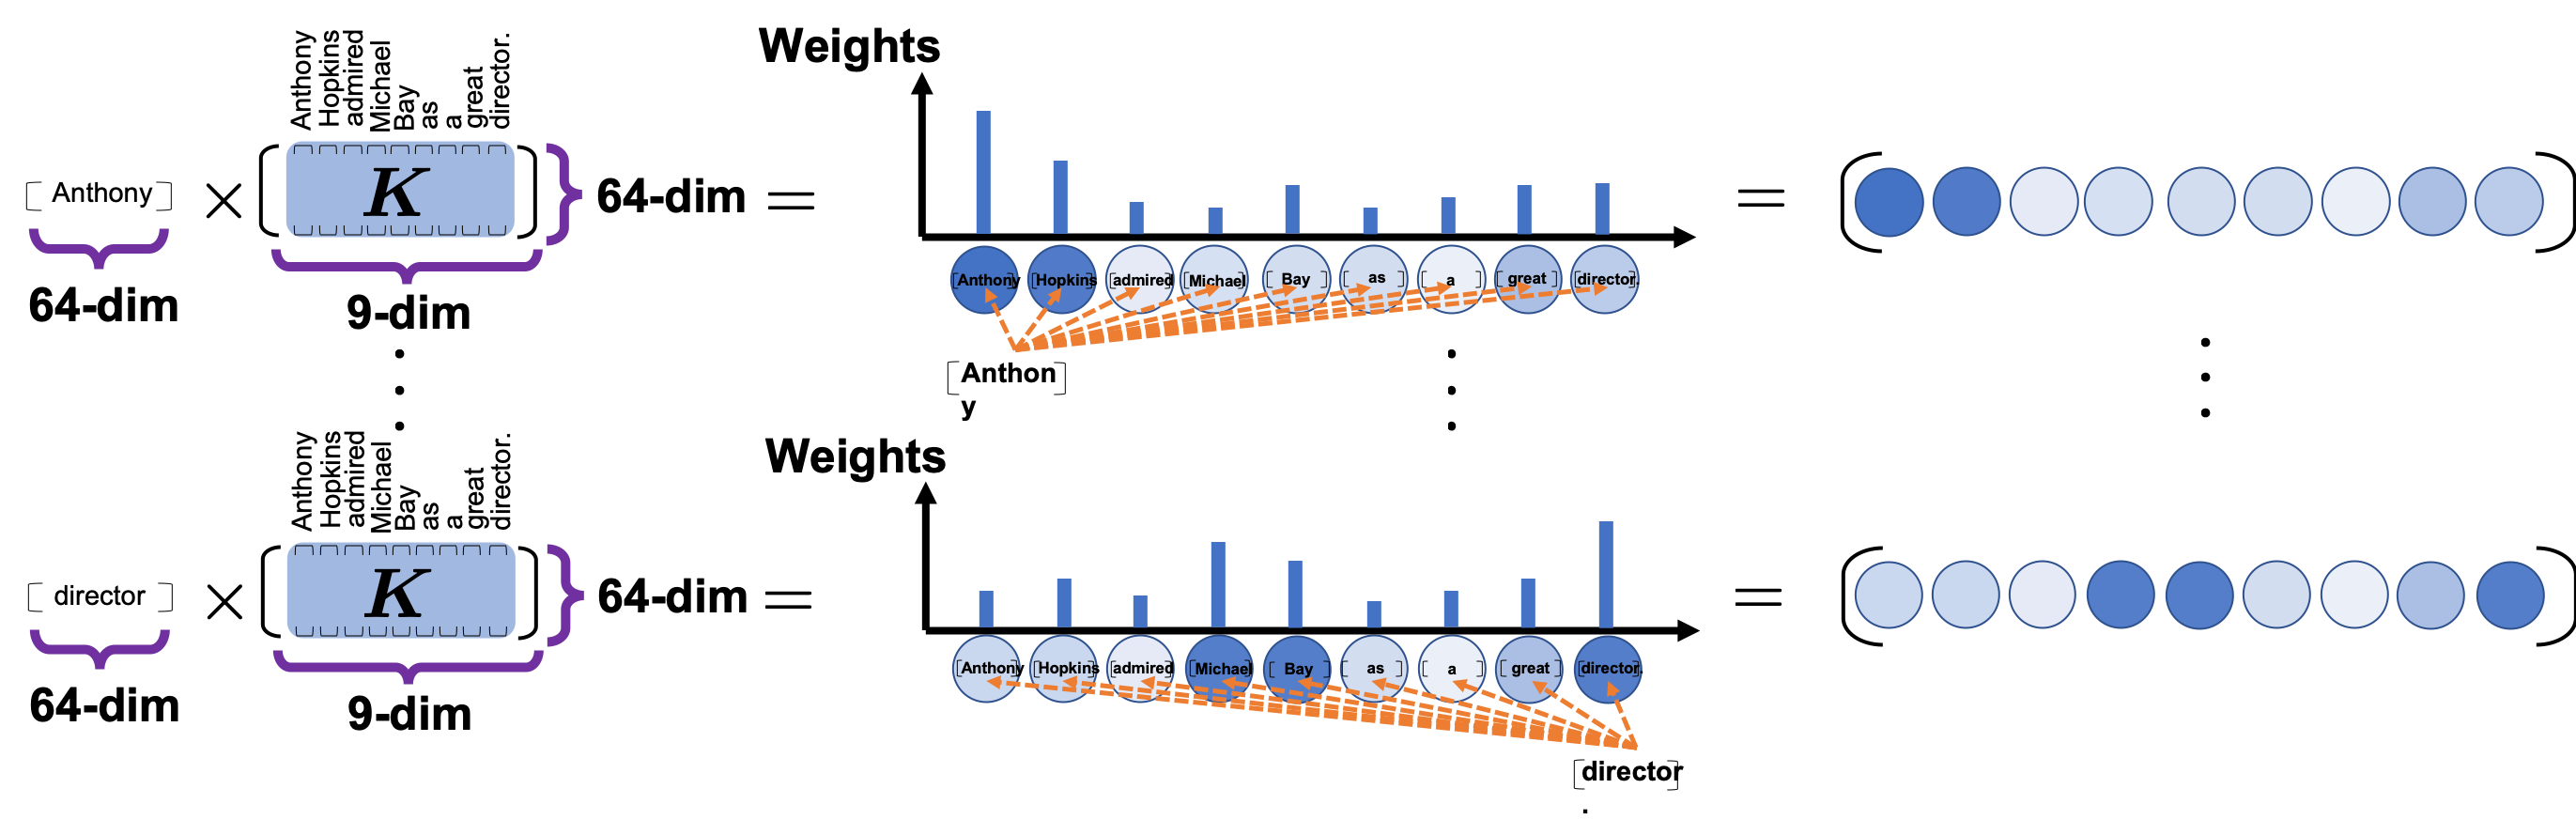
 . This also should be easy to understand if you know basics of linear algebra.